【JavaScript】モーダルウィンドウを実装する方法
「モーダルウィンドウを実装したいが方法がわからない」そんな方のために今回はJavaScriptでモーダルウィンドウの実装方法をご紹介します。
この記事ではシンプルなモーダルウィンドウと商品情報を拡大するモーダルウィンドウのコード例を取り上げていますので、ぜひ参考にしてください。
この記事は以下のお悩みを解決します。
- ・基本的なモーダルウィンドウの実装方法を知りたい
- ・コンテンツ内容を拡大表示するモーダルウィンドウの実装方法を知りたい
1. モーダルウィンドウとは?
モーダルウィンドウはボタンなどをクリックすると最前面に表示される画面のことです。ユーザーに特定の情報を表示したり、行動を促したりするのが目的で使われます。
また、ユーザーはウィンドウを閉じるまで他の操作ができません。モーダルウィンドウは以下の用途で使用されます。
- ・ユーザーに重要な情報を知らせたい場合
- ・お問い合わせフォームの入力内容を確認する場合
- ・ユーザーに利用規約の同意を求め、同意するまで次に進めないようにしたい場合
- ・コンテンツの内容を拡大表示したい場合
2. モーダルウィンドウの実装方法
モーダルウィンドウの動作は以下のようになります。ボタンなどの特定の場所をクリックするとJavaScriptでモーダルウィンドウの要素にクラスを追加し、画面全体を覆うように表示します。
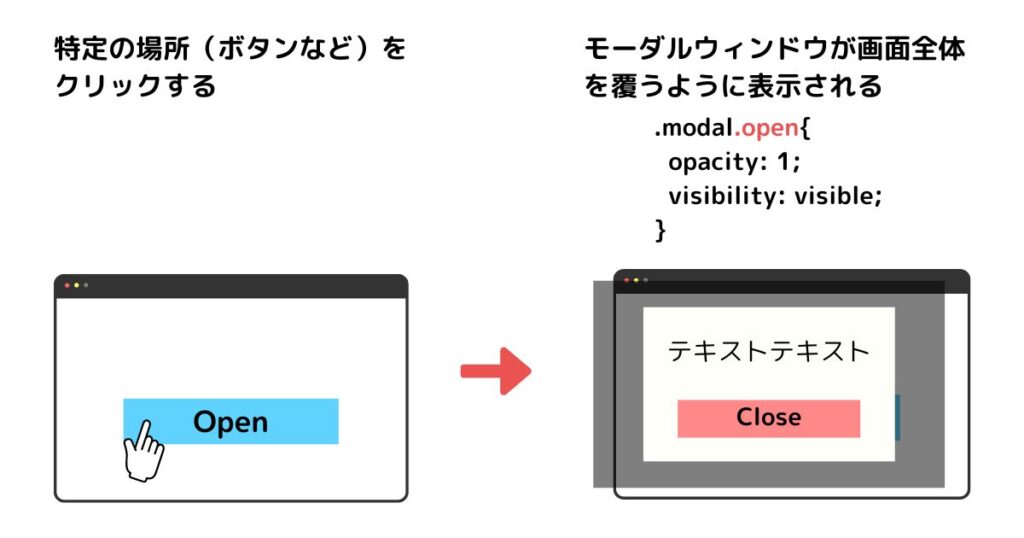
実際の動きは以下のようになります。
2-1. シンプルなモーダルウィンドウ
まずは、さきほどの動画にでてきたシンプルなモーダルウィンドウを実装します。
Openボタンをクリックするとモーダルウィンドウが表示され、コンテンツ部分にはテキストとCloseボタンを表示します。Closeボタンか背景をクリックすると非表示になるようにします。
CodePenで実際の動きを確認してみてください。
See the Pen Modal Window1 by CODE SQUARE (@Coffee1610) on CodePen.
HTMLのコードは以下のとおりです。
<div class="container">
 <div class="modal">
  <div class="modal-content">
   <p>テキストテキスト</p>
   <button type="button" class="close-btn">Close</button>
  </div>
 </div>
 <button type="button" class="open-btn">Open</button>
</div>
HTMLの解説
2-7行目:<div class=”modal”>~</div>
モーダルウィンドウの背景部分になります。半透明にして画面全体を覆います。
3-6行目:<div class=”modal-content”>~</div>
モーダルウィンドウのコンテンツ部分です。テキストとCloseボタンを表示します。
CSSのコードは以下のとおりです。
*{
  margin: 0;
  padding: 0;
}

.container {
  height: 100vh;
  position: relative;
}

.container button {
  width: 160px;
  height: 40px;
  border: 1px solid #CCC;
  cursor: pointer;
}

.container .open-btn {
  background-color: #5fd2ff;
  position: absolute;
  top: 50%;
  left: 50%;
  transform: translate(-50%, -50%);
  z-index: 1;
}

.container .modal {
  position: fixed;
  top: 0;
  left: 0;
  width: 100%;
  height: 100vh;
  background-color: rgba(0, 0, 0, 0.7);
  cursor: pointer;
  transition: 0.5s;
  opacity: 0;
  visibility: hidden;
  z-index: 2;
}

.container .modal.open {
  visibility: visible;
  opacity: 1;
}

.container .modal .modal-content {
  position: fixed;
  top: 50%;
  left: 50%;
  transform: translate(-50%, -50%);
  width: 250px;
  height: 250px;
  background-color: #FFF;
  display: flex;
  justify-content: center;
  align-items: center;
  flex-direction: column;
  cursor: default;
  padding: 20px;
}

.container .modal .modal-content p{
  margin-bottom: 20px;
}

.container .modal .modal-content .close-btn {
  background-color: #ff8888;
}
CSSの解説
.container .modal {
  position: fixed;
  top: 0;
  left: 0;
  width: 100%;
  height: 100vh;
  background-color: rgba(0, 0, 0, 0.7);
  cursor: pointer;
  transition: 0.5s;
  opacity: 0;
  visibility: hidden;
  z-index: 2;
}
28行目:position: fixed;
29行目:top: 0;
30行目:left:0;
.modalはモーダルウィンドウの背景部分になるので左上を基準にしてWebサイトの全面を覆うように配置します。
31行目: width: 100%;
32行目:height: 100vh;
モーダルウィンドウの背景を画面全体を覆うように設定しています。
33行目:background-color: rgba(0, 0, 0, 0.7);
モーダルウィンドウの背景部分の色が半透明にしています。
35行目:transition: 0.5s;
36行目:opacity: 0;
transitionとopacityを設定することで、表示、非表示を切り替えるときにフワッと切り替わります。
37行目:visibility: hidden;
初期状態ではモーダルウィンドウを見えないようにします。
.container .modal.open {
  visibility: visible;
  opacity: 1;
}
42行目:visibility: visible;
43行目:opacity: 1;
Openボタンがクリックされたら、モーダルウィンドウを見える状態にします。
JavaScriptのコードは以下のとおりです。
const openBtn = document.querySelector(".open-btn");
const closeBtn = document.querySelector(".close-btn");
const modal = document.querySelector(".modal");
const modalContent = document.querySelector(".modal-content");

//Openボタンをクリックしたらモーダルウィンドウを表示する
openBtn.addEventListener("click", () => {
  modal.classList.add("open");
});

//Closeボタンをクリックしたらモーダルウィンドウを非表示にする
closeBtn.addEventListener("click", () => {
  modal.classList.remove("open");
});

//背景をクリックしたらモーダルウィンドウを非表示にする
modal.addEventListener("click", () => {
  modal.classList.remove("open");
});

//コンテンツ部分をクリックしてもモーダルウィンドウを非表示にしないようにする
modalContent.addEventListener("click", (e) => {
  e.stopPropagation();
});
JavaScriptの解説
const openBtn = document.querySelector(".open-btn");
const closeBtn = document.querySelector(".close-btn");
const modal = document.querySelector(".modal");
const modalContent = document.querySelector(".modal-content");
1行目: const openBtn = document.querySelector(“.open-btn”);
Openボタンのbutton要素を取得しています。
- querySelector() :指定されたセレクターに一致する最初の要素を返します。
2行目:const closeBtn = document.querySelector(“.close-btn”);
Closeボタンのbuttonタグを取得しています。
3行目:const modal = document.querySelector(“.modal”);
モーダルウィンドウの背景のdivタグを取得しています。
4行目:const modalContent = document.querySelector(“.modal-content”);
モーダルウィンドウのコンテンツ部分のdivタグを取得しています。
//Openボタンをクリックしたらモーダルウィンドウを表示する
openBtn.addEventListener("click", () => {
  modal.classList.add("open");
});
7-9行目:openBtn.addEventListener(“click”, () => {~});
Openボタンをクリックすると8行目の処理を実行します。
- element.addEventListener(type, listener) :windowオブジェクトやHTML要素に特定のイベントが発生したときに実行する関数を登録する。
- type: イベントの種類を指定する。例:click、input、scrollなど
- listener: イベントが発生後に実行される関数を指定する。
8行目:modal.classList.add(“open”);
モーダルウィンドウの背景の要素「.modal」に「.open」クラスを追加します。これによりモーダルウィンドウが表示されます。
- element.classList.add(“class”):HTML要素に指定したクラスを追加する。
//Closeボタンをクリックしたらモーダルウィンドウを非表示にする
closeBtn.addEventListener("click", () => {
  modal.classList.remove("open");
});

//背景をクリックしたらモーダルウィンドウを非表示にする
modal.addEventListener("click", () => {
  modal.classList.remove("open");
});
12-14行目:closeBtn.addEventListener(“click”, () => {~});
Closeボタンをクリックすると13行目の処理を実行します。
13行目:modal.classList.remove(“open”);
モーダルウィンドウの背景の要素「.modal.open」から「.open」クラスを取り除きます。これによりモーダルウィンドウが非表示になります。
- element.classList.remove(“class”):HTML要素から指定したクラスを取り除く。
17-19行目:modal.addEventListener(“click”, () => {~});
モーダルウィンドウの背景をクリックすると18行目の処理を実行し、モーダルウィンドウが非表示になります。
//コンテンツ部分をクリックしてもモーダルウィンドウを非表示しないようにする
modalContent.addEventListener("click", (e) => {
  e.stopPropagation();
});
23行目:e.stopPropagation();
クリックイベントが親要素の「.modal」に伝搬しないようにします。この設定でコンテンツ部分をクリックしてもモーダルウィンドウが非表示にならないようにします。
- e.stopPropagation :現在発生しているイベントを親要素や他の祖先要素に伝搬するのを防ぎます。
2-2. コンテンツの内容を拡大表示するモーダルウィンドウ
今度はクリックした内容を拡大するモーダルウィンドウを実装します。ulタグ、liタグを使って複数の商品の画像、商品名、説明、価格を表示させ、liタグをクリックするとモーダルウィンドウを表示します。
モーダルウィンドウにはクリックした商品の情報、閉じるボタン、商品の詳細ページへのリンクのボタンを表示します。閉じるボタンと背景をクリックするとモーダルウィンドウを非表示にします。
CodePenで実際の動きを確認してみてください。
See the Pen Modal Window2 by CODE SQUARE (@Coffee1610) on CodePen.
HTMLのコードは以下のとおりです。
<div class="container">
    <ul class="product-list">
      <li class="product-item">
        <img src="画像のパス" class="product-img" alt="スニーカーA">
        <h2 class="product-title">スニーカーA</h2>
        <p class="product-desc">定番の一足</p>
        <p class="product-price">価格:8000円</p>
      </li>
      <li class="product-item">
        <img src="画像のパス" class="product-img" alt="スニーカーB">
        <h2 class="product-title">スニーカーB</h2>
        <p class="product-desc">クッション性が抜群</p>
        <p class="product-price">価格:12000円</p>
      </li>
      <li class="product-item">
        <img src="画像のパス" class="product-img" alt="スニーカーC">
        <h2 class="product-title">スニーカーC</h2>
        <p class="product-desc">待望の最新モデル</p>
        <p class="product-price">価格:15000円</p>
      </li>
    </ul>

    <div class="modal">
      <div class="modal-content">
        <button type="button" class="close-btn"></button>
        <img src="" class="modal-img" alt="">
        <h3 class="modal-title"></h3>
        <p class="modal-desc"></p>
        <p class="modal-price"></p>
        <div class="link-btn">
          <a href="#">詳細ページ</a>
        </div>
      </div>
    </div>
</div>
HTMLの解説
 <ul class="product-list">
      <li class="product-item">
        <img src="画像のパス" alt="スニーカーA">
        <h2 class="product-title">スニーカーA</h2>
        <p class="product-desc">定番の一足</p>
        <p class="product-price">価格:8000円</p>
      </li>
      <li class="product-item">
        <img src="画像のパス" class="product-img" alt="スニーカーB">
        <h2 class="product-title">スニーカーB</h2>
        <p class="product-desc">クッション性が抜群</p>
        <p class="product-price">価格:12000円</p>
      </li>
      <li class="product-item">
        <img src="画像のパス" class="product-img" alt="スニーカーC">
        <h2 class="product-title">スニーカーC</h2>
        <p class="product-desc">待望の最新モデル</p>
        <p class="product-price">価格:15000円</p>
      </li>
 </ul>
2-21行目: <ul class=”product-list”>~</ul>
商品の画像、商品名、説明、価格をリスト形式で表示しています。今回はliタグをクリックするとモーダルウィンドウを表示します。
  <div class="modal">
      <div class="modal-content">
        <button type="button" class="close-btn"></button>
        <img src="" class="modal-img" alt="">
        <h3 class="modal-title"></h3>
        <p class="modal-desc"></p>
        <p class="modal-price"></p>
        <div class="link-btn">
          <a href="#">詳細ページ</a>
        </div>
      </div>
  </div>
26行目: <img src=”” class=”modal-img” alt=””>
モーダルウィンドウに商品画像を表示するimgタグです。JavaScriptでsrcとaltを設定するので空にしています。
27行目: <h3 class=”modal-title”></h3>
28行目:<p class=”modal-desc”></p>
29行目: <p class=”modal-price”></p>
モーダルウィンドウに商品名、説明、価格を表示するh3、pタグです。ここもJavaScriptでテキストを設定するので中身は空にしています。
CSSのコードは以下のとおりです。
*{
  margin: 0;
  padding: 0;
}

ul {
  list-style: none;
}

a {
  text-decoration: none;
}

img {
  width: 100%;
}

.container {
  height: 100vh;
  padding: 0 1%;
  display: flex;
  align-items: center;
}

.container .product-list{
  display: flex;
  justify-content: space-between;
}

.container .product-list .product-item{
  width: 27%;
  padding: 10px;
  border: 1px solid #CCC;
  transition:  0.5s;
  background-color: #FFF;
  cursor: pointer;
}

.container .product-list .product-item .product-title{
  font-size: 16px;
}

.container .product-list .product-item .product-desc,
.container .product-list .product-item .product-price{
  font-size: 12px;
}

.container .product-list .product-item:hover{
  background-color: #bbb;
}

.container .modal {
  position: fixed;
  top: 0;
  left: 0;
  width: 100%;
  height: 100vh;
  background: rgba(0, 0, 0, 0.7);
  transition: 0.5s;
  cursor: pointer;
  visibility: hidden;
  opacity: 0;
  z-index: 2;
}

.container .modal.open {
  visibility: visible;
  opacity: 1;
}

.container .modal .modal-content {
  position: fixed;
  top: 50%;
  left: 50%;
  transform: translate(-50%, -50%);
  width: 250px;
  height: 310px;
  background-color: #FFF;
  cursor: default;
  padding: 20px;
}

.container .modal .modal-content .close-btn {
  position: fixed;
  top: -25px;
  right: -25px;
  z-index: 5;
  width: 30px;
  height: 30px;
  cursor: pointer;
  border-radius: 50%;
  background: #FFF;
  border: none;
}

.container .modal .modal-content .close-btn::before,
.container .modal .modal-content .close-btn::after
{
  content: "";
  width: 90%;
  height: 3px;
  background-color: #bbb;
  position: absolute;
  top: 14px;
  left: 2px;
  border-radius: 10px;
}

.container .modal .modal-content .close-btn::before{
  transform: rotate(45deg);
}

.container .modal .modal-content .close-btn::after{
  transform: rotate(-45deg);
}

.container .modal .modal-content .modal-img {
  width: 100%;
}

.container .modal .modal-content .modal-price {
  margin-bottom: 30px;
}

.container .modal .modal-content .link-btn {
  text-align: center;
}

.container .modal .modal-content .link-btn a{
  display: inline-block;
  background-color: #ff5b45;
  color: #FFF;
  padding: 5px 20px;
  transition: 0.5s;
}

.container .modal .modal-content .link-btn a:hover{
  opacity: 0.7;
}
JavaScriptのコードは以下のとおりです。
const productItems = document.querySelectorAll(".product-item");
const closeBtn = document.querySelector(".close-btn");
const modal = document.querySelector(".modal");
const modalContent = document.querySelector(".modal-content");
const modalImg = document.querySelector(".modal-img");
const modalTitle = document.querySelector(".modal-title");
const modalDesc = document.querySelector(".modal-desc");
const modalPrice = document.querySelector(".modal-price");

productItems.forEach((productItem) => {
  productItem.addEventListener("click", (e) => {
    modal.classList.add("open");
    e.currentTarget.classList.add("active");

    //クリックした商品情報を取得
    const imgSrc = e.currentTarget.querySelector(".product-img").getAttribute("src");
    const title = e.currentTarget.querySelector(".product-title").textContent;
    const desc = e.currentTarget.querySelector(".product-desc").textContent;
    const price = e.currentTarget.querySelector(".product-price").textContent;

    //クリックした商品情報をモーダルウィンドウのコンテンツに設定する
    modalImg.setAttribute("src", imgSrc);
    modalImg.setAttribute("alt", title);
    modalTitle.textContent = title;
    modalDesc.textContent = desc;
    modalPrice.textContent = price;
 });
});

//モーダルの背景をクリックするとモーダルウィンドウを非表示にする
modal.addEventListener("click", () => {
 deleteData();
});

//☓ボタンをクリックするとモーダルウィンドウを非表示にする
closeBtn.addEventListener("click", () => {
deleteData();
});

//モーダルを非表示にするときの処理
const deleteData = () => {
 const activeItem = document.querySelector(".product-item.active");
 activeItem.classList.remove("active");
 modal.classList.remove("open");

 //モーダルウィンドウに設定した商品情報をリセット
 setTimeout(() => {
  modalImg.setAttribute("src", "");
  modalImg.setAttribute("alt", "");
  modalTitle.textContent = "";
  modalDesc.textContent = "";
  modalPrice.textContent = "";
 }, 300);
}

//モーダルのコンテンツをクリックしても非表示にしないようにする
modalContent.addEventListener("click", (e) => {
  e.stopPropagation();
});
JavaScriptの解説
const productItems = document.querySelectorAll(".product-item");
const closeBtn = document.querySelector(".close-btn");
const modal = document.querySelector(".modal");
const modalContent = document.querySelector(".modal-content");
const modalImg = document.querySelector(".modal-img");
const modalTitle = document.querySelector(".modal-title");
const modalDesc = document.querySelector(".modal-desc");
const modalPrice = document.querySelector(".modal-price");
1行目:const productItems = document.querySelectorAll(“.product-item”);
liタグ「.product-item」を全て取得します。
- querySelectorAll() :指定されたセレクターに一致する全ての要素を取得し、NodeListで返す。NodeListは配列のようにインデックスを用いて要素にアクセスできる。
2行目:const closeBtn = document.querySelector(“.close-btn”);
モーダルウィンドウを閉じるためのbuttonタグを取得します。
5行目:const modalImg = document.querySelector(“.modal-img”);
モーダルウィンドウに商品の画像を表示するためのimgタグを取得します。
6行目:const modalTitle = document.querySelector(“.modal-title”);
モーダルウィンドウに商品名を表示するためのh3タグを取得します。
7行目:const modalDesc = document.querySelector(“.modal-desc”);
モーダルウィンドウに商品の説明を表示するためのpタグを取得します。
8行目:const modalPrice = document.querySelector(“.modal-price”);
モーダルウィンドウに商品の価格を表示するためのpタグを取得します。
productItems.forEach((productItem) => {
  productItem.addEventListener("click", (e) => {
    modal.classList.add("open");
    e.currentTarget.classList.add("active");

    //クリックした商品情報を取得
    const imgSrc = e.currentTarget.querySelector(".product-img").getAttribute("src");
    const title = e.currentTarget.querySelector(".product-title").textContent;
    const desc = e.currentTarget.querySelector(".product-desc").textContent;
    const price = e.currentTarget.querySelector(".product-price").textContent;

    //クリックした商品情報をモーダルウィンドウのコンテンツに設定する
    modalImg.setAttribute("src", imgSrc);
    modalImg.setAttribute("alt", title);
    modalTitle.textContent = title;
    modalDesc.textContent = desc;
    modalPrice.textContent = price;
 });
});
10-28行目:productItems.forEach((productItem) => {~});
各liタグに対してクリックイベント(11-27行目)を設定します。
- NodeList.forEach(callback) :NodeList(または配列)の各要素に対して関数を実行する。
- ・callback :NodeList(または配列)の各要素に対して実行する関数
11-27行目: productItem.addEventListener(“click”, (e) => {~});
liタグをクリックしたらモーダルウィンドウを開き、商品情報を表示します。
13行目:e.currentTarget.classList.add(“active”);
クリックしたliタグに「active」クラスを追加します。e.currentTargetはクリックした要素(liタグ)を指します。
16行目:const imgSrc = e.currentTarget.querySelector(“.product-img”).getAttribute(“src”);
クリックした商品の画像のsrcを取得します。
- element.getAttribute(attributeName) :指定した要素の属性を取得する
- ・attributeName :取得する属性
17行目:const title = e.currentTarget.querySelector(“.product-title”).textContent;
18行目:const desc = e.currentTarget.querySelector(“.product-desc”).textContent;
19行目:const price = e.currentTarget.querySelector(“.product-price”).textContent;
クリックした商品のタイトル、説明、価格を取得します。
- element.textContent :指定した要素のテキスト内容を取得または設定する。
22行目: modalImg.setAttribute(“src”, imgSrc);
23行目: modalImg.setAttribute(“alt”, title);
モーダルウィンドウのimgタグにsrcとaltを設定します。
- element.setAttribute(name, value) :要素に属性と値を設定する
- ・name :属性名
- ・value :値
24行目: modalTitle.textContent = title;
25行目:modalDesc.textContent = desc;
26行目:modalPrice.textContent = price;
モーダルウィンドウに商品名、説明、価格をh3タグ、pタグにそれぞれ設定します。
//モーダルを非表示にするときの処理
const deleteData = () => {
 const activeItem = document.querySelector(".product-item.active");
 activeItem.classList.remove("active");
 modal.classList.remove("open");

 //モーダルウィンドウにセットしたデータをリセット
 setTimeout(() => {
  modalImg.setAttribute("src", "");
  modalImg.setAttribute("alt", "");
  modalTitle.textContent = "";
  modalDesc.textContent = "";
  modalPrice.textContent = "";
 }, 300);
}
42行目:const activeItem = document.querySelector(“.product-item.active”);
43行目:activeItem.classList.remove(“active”);
アクティブなliタグを取得し、「active」クラスを取り除きます。
47-54行目:setTimeout(()=> {~});
モーダルウィンドウに設定した商品情報をリセットします。setTimeoutを指定することですぐに削除するのではなく、0.3秒後に実行します。
これにより閉じている途中でモーダルウィンドウの画像やテキストが消えずにスムーズに非表示にできます。
- setTimeout(code, delay) :一定時間後に処理を実行します。
- ・code :実行する処理
- ・delay :処理を実行するまでの遅延時間(ミリ秒)
3. まとめ
今回はJavaScriptでモーダルウィンドウを実装する方法をご紹介しました。モーダルウィンドウはいろいろな用途があるので、まず最初に紹介したシンプルなモーダルウィンドウを実装して、そこからより実践的なモーダルウィンドウを実装してみて下さい。
参考にしていただければ幸いです。

